"Continuous Integration 1, 2, 3" Exercise
Prerequisites
Learning Objectives
Learn how to configure an application's automated tests to be run on a continuous integration server.
Practice techniques for preventing bugs and undesired application functionality from reaching end users.
Setup
Start following the tutorial to integrate Travis CI with your GitHub account.
If you haven't yet completed the "Testing 1, 2, 3" Exercise, take a moment to do that now. We'll build on that application for the purposes of this exercise. Our goal is to configure a remote repository to run automated tests whenever we propose a change to this application's source code.
Navigate to the "testing-123" directory from the command line, and open it with a text editor. Verify your ability to run its tests before moving on:
cd path/to/testing-123 # or some other path to your repo

pytest
Great, the local directory is looking good. Let's take a moment to create a new remote repository on GitHub where we will push this code to. When creating a new remote repository, you should see the option to grant repo access to Travis CI platform. Ensure this option is selected!
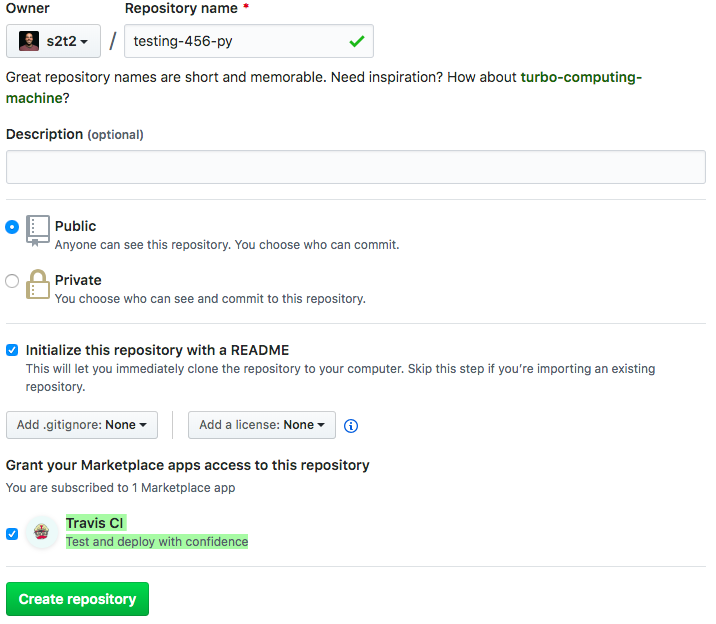
NOTE: To configure Travis CI on an existing repository, or if you don't see the Travis CI option during repo creation, visit the Travis account settings and click "Manage repositories on GitHub", where you will be redirected to GitHub and prompted to select which repositories to configure.
As a final setup step, if you haven't yet done so, either clone your existing "testing-123" repository onto your local computer, or initialize a new Git repository in your local "testing-123" directory then associate that local repository with the remote repository's remote address:
NOTE: if you see an error like "failed to push some refs", you may have to do a "forced" push with
git push origin main -finstead.
You should now be able to see your code reflected on GitHub.
Configuration
Continue following the Travis CI tutorial by adding a special configuration file called ".travis.yml" to the root directory of your repository, and place inside the following contents:
This file will instruct the CI server to use a specific version of python, install package dependencies, and run tests.
NOTE: The
dist: xenialsetting is necessary at this time for installation of Python version 3.7, and theinstall: pip install -r requirements.txtsetting is only necessary if there are packages to install, so you can omit the "install" setting for this application. Pytest should already be automatically installed on the CI server, so there isn't a need to install it again via Pip.
Commit this new configuration file to the version history:
Deploying
Push your local code up to the remote repository:
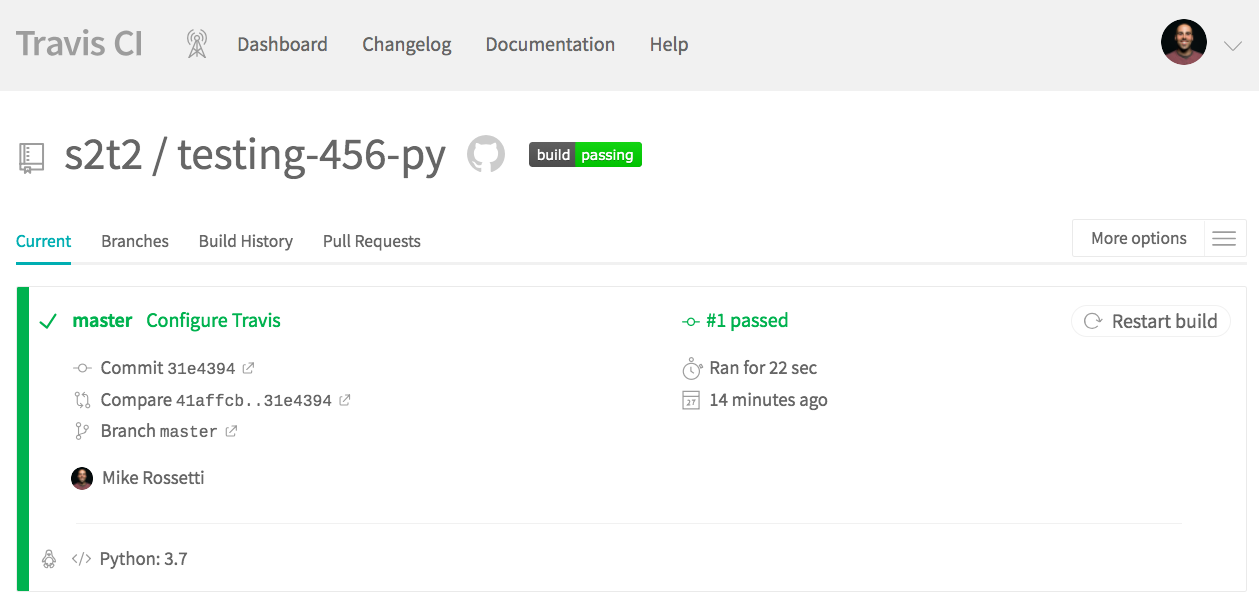
This push should now trigger the execution of automated tests on the CI server. Visit your repository's CI "builds" at a URL like https://travis-ci.com/GITHUB_USERNAME/GITHUB_REPONAME to see the results of the automated tests and verify Travis has been configured properly:
Status Badges
OPTIONAL, if you want to show off the status of your build in your repo's README file!
In your repository page on Travis, locate the green "build: passing" icon and click on it. Choose "markdown" from the dropdown and copy the resulting snippet of markdown code. It should look like [](https://travis-ci.com/s2t2/testing-456-py). Paste that code into your repository's README file, somewhere near the top, and save the file.
Commit this change and push up to GitHub to see the badge reflected on your repository's homepage on GitHub:
Branch Operations
To make use of the more helpful aspects of the GitHub and Travis CI integration, let's practice a workflow involving branch operations and Pull Requests.
Check out a new branch called something like "my-new-feature":
Edit the code in the application file (but don't update the corresponding test, so the tests will be failing):
Save and commit these breaking changes, then push them to the "my-new-feature" branch:
You should be able to follow the resulting link to view your branch online and open a Pull Request to propose it be merged into the "main" branch.
Opening this PR should trigger a CI build, which in this case we expect to be failing:
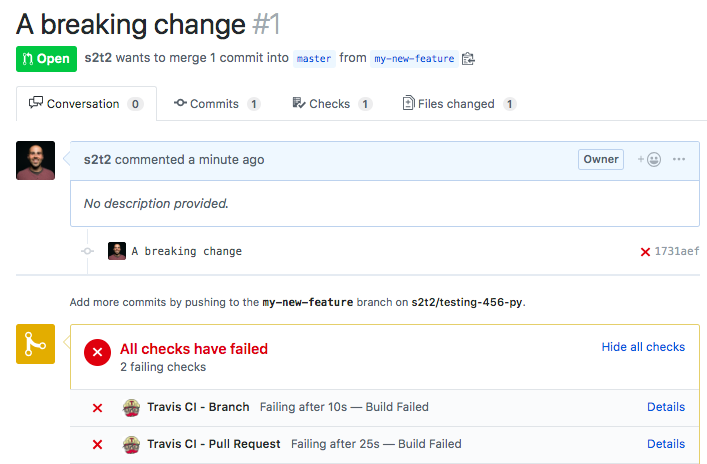
This is an example of how automated checks can help alert developers to the need to fix breaking changes they may have contributed.
Requiring Status Checks
OPTIONAL
Follow this guide to designate the "main" branch as a protected branch, and "enable status checks" for the remote repository. Add a "branch protection rule" with a name pattern of "main", and enable the "Require status checks to pass before merging" and "Require branches to be up to date before merging" settings:
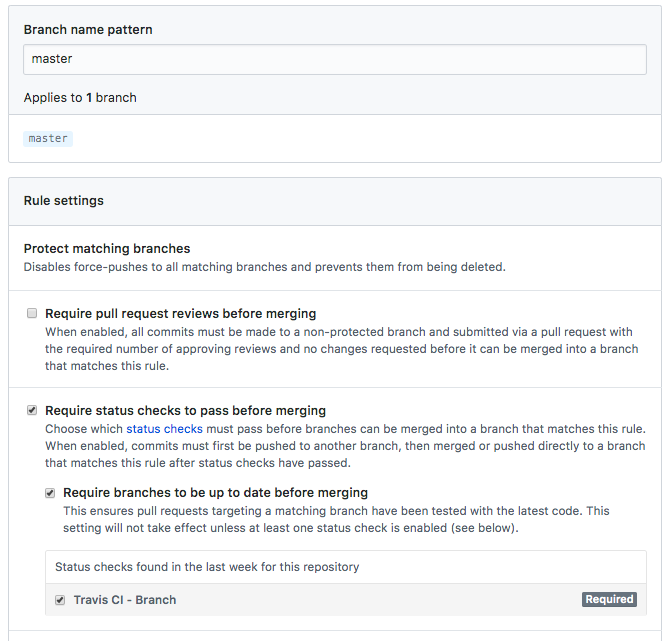
Revisit your PR with the failing build and notice it now has merge restrictions:
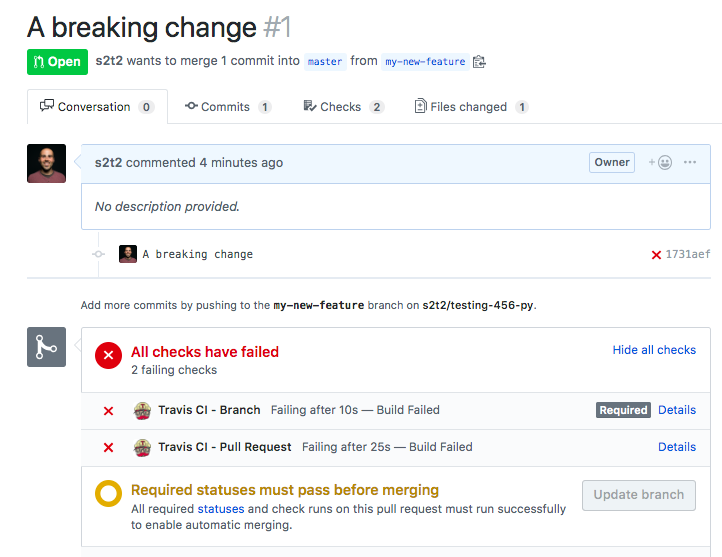
This is an example of how automated checks can help prevent breaking changes from reaching end users.
Last updated